Streets – How to Import Core Entities
Version 0.7 – rick@mcqcorp.com – 310-947-1759 – 2025-06-06
6/6/2025: CURRENTLY ONLY COPIED FROM IMPORTLOCATIONS – READY TO START MODOFICATIONS
Contents
1.1 Who is this for (the Audience)?
1.5 Similar Fields – Don’t Get Confused
3.1 Sources: Online Maps or Other
4 STEP I: PREPARING THE SPREADSHEET (FOR LOADING)
5.2 Quality and DevNotes (Columns A and B)
5.8 NumExt (Street Number Extension)*
5.11 What about locations with no address?
5.13 Status (Location Status)*
6.2 Occupant SubArea (OccSubArea) *
6.3 Occupant Area Tags (OccAreaTags)
10 Reporting Problems and Limitations
11.1 Multiple-tenant locations
12 STEP II: UPLOADING THE SPREADSHEET INTO THE DATABASE
13 STEP III: ADJUSTING THE MAP DATA IN THE DATABASE
15.1 Map Set: Hermosa Beach Downtown (Map Set Id 9)
15.2 Map Set: Manhattan Beach 90266 Downtown (Map Set Id 3)
15.2.1 90266 Downtown: Picture
15.2.2 90266 Downtown: Map List
15.2.3 90266 Downtown: Instructions
15.3 Manhattan Beach Corridors (Map Set Id 5)
15.4 Riviera Village (Map Set Id 7)
15.5 Artesia Blvd. (Map Id 1) – Check and Complete Contact Info
15.6 Aviation Blvd. (Map Id 4) – Check and Complete Contact Info
1 Introduction
1.1 Who is this for?
This document is for people who want to quickly load ‘core’ data into the Streets app (Projects, Needs, Goals, and Profiles). This data might come from other databases or apps, or might be generated by an AI agent, or entered into the spreadsheet manually, User roles are:
1. Clients. Clients can load data for themselves, and/or to share with friends.
2. Sellers. Sellers can load data they will share with clients and help to fulfill their needs.
3. Advisors. Advisors can load data that they will share with clients and advise them on.
1.2 What is This?
This document provides instructions for how to bulk-load the main data entities into Streets. There are three major tasks:
I. Decide what data you want to capture.
II. Load the spreadsheet with your data.
III. In the spreadsheet, review the loaded data and make corrections in the spreadsheet.
IV. Import the spreadsheet data.
V. In the app/database, review the imported entities and finalize the data.
VI. “Activate” the entities for sharing or for actual use.
You can do steps I and II without an account. You’ll need an account to do the rest.
1.3 Other Key Documents
You’ll want to have the companion Excel spreadsheet for this document called:
Streets-ImportCoreEntities-WithTestData.xlsx ($FINISH$ - Link)
The companion spreadsheet completes the explanation of some of the details.
CONTINUE HERE.
1.4 The Core Entities
See the Streets User Guide for background informaito on the core entities: Goals, Projects, Needs, and Profiles.
For the purposes of importing, you’ll want to know the following:
1. All the core entities share common fields. These fields (Name, Descr, Summary, Area, Type, etc.) are the headings of the Import Core Entities spreadsheet.
1.5 Terms and Abbreviations
|
Term |
Meaning / Notes |
|
|
|
|
|
|
required * |
Indicates a required field, a field that must be filled in. However, in some cases the field must just be considered, but may be left empty if it is the default value, which will be filled in automatically by the importer. |
|
|
Occ |
Occupant, the resident of an address (building) |
|
|
Own |
Owner, the owner of a property (or their agent) who may lease, rent or sell the property. |
|
|
Loc |
A location, usually an address but may also be a street, an easement, etc. |
|
|
CP |
CP is a compass point: N, E, S, and W for North, South, East, and West, respectively (the intermediate points NE, SE, SW, NW are currently not used). |
|
|
Cdl |
Comma-delimited list. These fields can have a single entry (cat) or multiple entries separated by commas (“cat,dog,bird“). |
|
|
Cdlwec |
Comma-delimited list with ending comma. As if Cdl isn’t bad enough, this one has a comma on the end (“cat,dog,bird, “). |
|
|
Cdlwbaec |
Comma-delimited list with beginning and ending comma (“,cat,dog,bird,”). |
|
|
Json |
Ignore any references. |
|
1.6 Similar Fields – Don’t Get Confused
There are separate Notes fields for the location, the occupant, and the owner. Please try to use the proper field when saving any notes (e.g. don’t put notes about the owner in the location notes field).
1. LocNotes are about the actual building or property or other physical aspect of the location.
2. OccNotes are about the business (or other tenant) that currently occupies the location.
3. OwnNotes are about the owner (or manager or lessor) of the property.
2 Preparation
To load the spreadsheet, you’ll need the following:
1. A plan of the entities you want to load.
2. The spreadsheet.
3. An account in the SouthBayStreets.com (“Streets”) app.
4. This document, to help you prepare, load, and finalize your core entities.
3 Planning and Designing your Core Data
FINISH
4 STEP I: PREPARING THE SPREADSHEET (FOR LOADING)
The next several sections describe how to fill in the spreadsheet to prepare it for loading. Depending on the assignment, Step I may be all you need to do. Then, you would submit the spreadsheet for someone else to load. Or you may need to complete the subsequent steps II through IV.
Make a copy of the spreadsheet for each map you will load. As an option, you may use multiple spreadsheets for a map, to load the map section by section.
5 Fields in the Spreadsheet
5.1 Overview
The first two fields, Quality and DevNotes, allow you to build the spreadsheet over time and load it before all data is perfect. Once loaded, you can then filter for data with quality problems and correct it using the application’s screens.
Many fields $FINISH$ are not required.
5.2 Quality and DevNotes (Columns A and B)
5.2.1 Quality
The Quality field refers to the quality of the location record in the spreadsheet. (not your opinion of the quality of the business!). You need not use this field, but you may use it if you want to import any records that are incomplete or inaccurate. As described below, all required fields must be provided although sometimes you can leave them blank to ‘provide’ a value.
|
Value |
Description/Notes |
|
|
(empty) |
See Completed |
|
|
Completed |
The record is usable as-is. |
|
|
Working |
The record should not be used as is; it has one or more quality problems that should be fixed first |
|
|
|
|
|
5.2.2 DevNotes
You can use the DevNotes field to describe specific quality problems that you are working on. For example “validate street address”, “validate business type”, etc. When you’re done you might want to clear this field, but you may leave any notes here; in fact, it might be a good place to leave notes about any minor quality issues that might be good to address in the future.
These remaining fields all apply to the location itself.
5.3 MapId*
The internal Id of the map on which this location/address appears. The MapId is a sequence number assigned by the app when a map is created. You will be able to build and modify maps for which you have permission.
When using the import screen to load into the app, the MapId must correspond to the Map from which you entered the Import Locations page. Otherwise, the row will not load.
5.4 LinkedMapId
Most LinkedMapId fields will be empty. The LinkedMapId is often used (and should always be used) when a street (a CrossStreet or a TeeStreet) has its own street map. You must first find the internal Id of that map, and then simply enter it into the LinkedMapId column. Then you will have a very nice link from your map to another map!
5.5 LocType (Location Type) *
LocType is required, however, if LocType is not filled in it will be assumed to be an Address (of a business). So, you must just check that each of the non-address fields is filled out properly. Valid values are:
|
Type |
Description |
Notes |
|
|
|
|
|
(empty) |
Same as Address (below). |
|
|
Address |
An address would be any improvement (structure) that has a street address. |
|
|
Boundary |
($FINISH$ - No need to use?) |
Block breaker |
|
CrossStreet |
A street that crosses the center (spinal) street of the map. So, there should be one of these for each side of the spinal street, and they should meet up. |
Block breaker |
|
Easement |
|
|
|
|
|
|
|
Multiple |
A structure that has multiple tenants that are usually different businesses. |
|
|
Residence |
A place where people live. Business isn’t conducted here. |
|
|
Space |
A stretch on a map with no address, buildings, etc. A space might be a placeholder that will be replaced later by other location types. |
|
|
TeeStreet |
A street that ends in a “T” intersection. |
|
|
|
|
|
5.6 LocName
(This is not the name of the occupant/business, see below.) Most locations don’t have names. But if the location has a name, go ahead and provide it. This is most common for multi-tenant locations, such as a plaza, as described next.
NOTE that names of streets and many other non-addresses are nevertheless in the Occupant Name field, not the Location Name field. It doesn’t make much sense, but that’s the way it is for now.
Multiple tenant locations. A location name is required for multi-tenant locations. Here’s how it works:
1. Create one location entry for the entire multi-tenant location. Give this entry the name of the location, and make it a Type = ‘Multiple’. If it doesn’t have a name, create a name yourself, such as ‘Artesia 2050-2090’ or ‘’.
a. DON’T use the same name twice for two different locations
b. DO use the same name (an exact spelling/match) for this location and all tenant locations (see next).
2. Create an entry for each tenant of the Multiple tenant location and give it the same name as it’s ‘parent’ multiple location. It should have an address number that is ‘appropriate’ for its Multiple ‘parent’, and also a street number extension. If none are shown, create one that will allow the locations to display in an acceptable order, for example, you could simply use 1,2,3, … .
Single occupant locations. Any single location could have a name, especially if its noteworthy, historical, or just commonly known with affection, for example “Gamble House”, “Disney’s Birthplace”, “The Breakers”, etc.
[INTERNAL NOTE: Note that ParentLocationId field is not in the spreadsheet. This linking is done using the LocName field.]
5.7 StreetNum*
This must be just the numerical part of the street address.
5.8 NumExt (Street Number Extension)*
This is the ‘breakdown’ part of the street number into sub-units. Some examples:
1. 1, 2, 3, 4 …
2. A, B, C, D, E …
3. Suite 100, Suite 101, Suite 200, etc.
4. Unit 1, Unit 2, …
5. Apt 100, Apt 200, …
5.9 Street*
This should be the single word name code of the center (‘spinal’) street of the map, e.g. “Artesia”, “Main”, … without “Street”, “Avenue”, etc.
5.10 Side*
Which side of the street is this location on? Must be either N, S, E, or W. Check the CP of the map’s spinal street. If the spinal street runs N or S, then the street sides are E and W. If the if the spinal street runs E or W, then the street sides are N and S. Sometimes the street runs along an angle to the CPs, so just use the spinal street’s CP as described above.
5.11 What about locations with no address?
In brief, the map is drawn by drawing each address in street number sequence. So all locations, even cross streets and tee streets, will have a street number, although you’ll have to make those up.
This is all explained in the Assigning Addresses subsection in the Order of the Rows section.
5.12 SeqNum (Sequence Number)
You normally don’t need to use the SeqNum field, and you must either leave the SeqNum field empty or fill in the SeqNums for all locations on a street side.
You (might) need to use SeqNums if the address numbers (along with the extensions) don’t provide the proper sorting for the map. This should be very rare.
IF you DO use the sequence numbers:
1. You must number all locations on the side of the street, if you number one.
2. Separate SeqNums by 100 to allow future insertions. For example,
a. DON’T use 1,2,3, …
b. DO use 100, 200, 300, 400, 500, …
Sequence numbers $FINISH$?
5.13 Status (Location Status)*
Status is required. However, if Status is not filled in it will be uploaded as ‘Occupied’ for ‘Address’ type locations, and it does not apply for non-‘Address’ type locations, so you can and should leave it empty for non-Address types. (Non-address types are always just ‘there’.)
Note that this list goes in reverse order of ‘preparation’, from an empty Lot to an Occupied status.
|
Status |
Description |
|
|
(empty) |
Same as Occupied (below). |
|
|
Occupied |
This is the most common. There is an occupant operating at the location. |
|
|
Preparing |
Not occupied, but [appears] in preparation for a known new occupant. |
|
|
Available |
Available for a new occupant. This is often ascertained by the appearance of emptiness or “for lease”/“for sale”/“available” signs. When available, capture as much of the ’owner’ (leasing or selling) information as possible (see below). |
|
|
Constructing |
A structure is being built. |
|
|
Lot |
A vacant lot or generally a location without usable ‘improvements’ (buildings). |
|
|
|
|
|
IMPORTANT: Available locations. One key here is to give non-occupied addresses a status of ‘Available’. That way, they will show on lists of available properties.
6 Occupant fields
The occupant name is required, and the phone number and url (website) are strongly requested. Record as much of this data as possible.
|
Field |
Description |
|
|
OccupantBusName* |
The name of the business. |
|
|
OccBusSubtitle |
Any added tag line, slogan that always accompanies the business name. |
|
|
OccBusNameAddl |
Any further explanation that is on the business signage, etc. |
|
|
OccArea |
(SEE BELOW) |
|
|
OccSubArea |
(SEE BELOW) |
|
|
OccAreaTags |
(SEE BELOW) |
|
|
OccPersonName |
The full name of the business contact |
|
|
OccPhone |
Telephone number |
|
|
OccEmail |
|
|
|
OccUrl |
The business website address. |
|
|
OccNotes |
Any additional notes about the business. |
|
6.1 Occupant Area (OccArea) *
This is the area (i.e. product or service sector) of the business that occupies the location. It is required for ‘Address’ LocType locations with ‘Occupied’ Status. You can (and should) leave it blank for non-Address type locations, or for Address types that are not occupied, unless some special situation arises that you should discuss with your manager.
The occupant areas are listed on the OccArea worksheet in the Import Locations spreadsheet.
Use these listed OccAreas whenever possible. However, if you absolutely must add a new OccArea, enter any new ones at the bottom of the standard list. We will discuss these and may incorporate.
6.2 Occupant SubArea (OccSubArea) *
The Occupant SubArea is the specific business within the Area. It’s especially needed for Dining+Food, Retail, and Service area businesses, among others. It’s also very helpful for other areas.
$FINISH$: List many of these codes, with examples.
6.3 Occupant Area Tags (OccAreaTags)
Occupant Area Tags are not required but are highly encouraged. They are very useful in providing specific information about a business. They can also be used to tag businesses as:
1. Unique, unusual, etc. (“#uncommon”)
2. Part of an event.
3. An additional offering not normally
Enter each tag, separated by comma.
Tags with multiple words will use Pascal casing, where each word is capitalized, for example: “#ThreeWordTag”.
7 Owner fields
When an address is Available (that is, unoccupied) , owner information (who to contact for lease/purchase) is usually posted. Sometimes owner info is always posted, even when occupied. Retrieve all owner information that can be gathered from signage or other sources.
|
Field |
Description |
|
|
OwnCompanyName |
The name of the leasing/selling company or owning company. |
|
|
OwnContactName |
The name of the person to contact for leasing, sales, etc. |
|
|
OwnPhone |
Telephone number |
|
|
OwnEmail |
The full name of the business contact |
|
|
OwnUrl |
The business website address. |
|
|
OwnNotes |
Any additional notes about the business. |
|
8 Additional Fields
These fields are all optional, but can be very helpful in an understanding of the location:
|
Field |
Description |
|
|
LocNotes |
ANY helpful notes on the location. |
|
|
FrontageLength |
(SEE BELOW) |
|
|
SquareFootage |
Great to have if provided (often when the location is available for lease/purchase) |
|
|
SizeNotes |
Any additional helpful information on the size (beyond square footage) |
|
|
ConditionNotes |
Any helpful notes on the condition of the property (example: brand new, needs repair, teardown) |
|
|
CustTypes |
B2C, B2B |
|
|
CustInteractionTypes |
WalkIn, Appointment, Online |
|
|
LatLong |
The latitude and longitude values. Two numbers separated by a comma. These can be retrieved by right-clicking on the property on Google Maps. These highly requested. Always get both values, not just one. |
|
|
|
|
|
8.1.1 FrontageLength
Frontage length is useful to increase the size of a location’s rendering on the map. This can really help to make the map proportional and easier to understand.
1. Frontage length is a percentage of the ‘standard frontage length’. The default (when empty) is 100, for 100%.
2. If a location is double-wide on the street, you can enter a frontage length of 200 to make the location render ‘twice-as-wide’ as the other locations on the street.
3. You can use any sensible number: examples are 150, 200, 250, 300, 1000, 2000 (for a giant location), etc.
4. Numbers below 100 might not ‘shrink’ the rendering, but you can try it.
9 Order of the Rows
9.1 Street Sides and Blocks
$FINISH$
9.2 Order of the Rows
The order that you load the data usually doesn’t matter. What matters is the order of the addresses (street number + number extension + street).
$FINISH$
The rows can be in almost any order in the
spreadsheet. The only rule is that a ‘Multiple’ location must come before all
of its tenant locations (so that they can be assigned when loaded).
The one time the order does matter is when loading multiple-type locations (properties with LocType of “Multiple”, that is, locations that hold multiple tenants). The “parent” location must be loaded first with its unique location name, then each child property (with LocType of “Address”) must be added with the same LocName.
In the future: This will also matter for sub-locations. $FINISH$
However, because of the way blocks are broken up by cross streets, easements, and boundaries, you will find it easiest to order your data block by block. For example, collect one streetside block’s worth of data up to the cross street, then collect the other street side’s data up to that same cross street, and continue until the whole map is listed in the spreadsheet.
You could interleave locations on both sides of the street up until the cross street, but that seems more confusing.
9.3 Assigning Addresses
Even though streets (and some other location types) don’t have addresses, you’ll need to give them a “fake” address number in order to get them to sort and display correctly along the street. So if a cross street comes between address 1098 and 2000, assign it any in-between address (1099, 1099.999, etc.). (It might be good to use an even number on even-numbered streetside (e.g. 1099.8)).
The only exception to this is if you use the SeqNum to sort the locations on a street side. Then you don’t need to assign “fake” addresses.
10 Reporting Problems and Limitations
This system has been developed using streets that we know. However, as new maps are added, you may find that this system doesn’t fit well with new situations. Therefore, you should present ‘fit’ issues to your manager so that we can resolve them.
Choices of what to do are:
1. Find a way to make the current system work.
2. Modify the current system to meet the new map’s needs.
3. Live with the fit problem; note that the map is imperfect, and plan to resolve in the future.
Expected fit issues:
1. Occupant Areas will probably need to be expanded.
2. Other ‘code lists’ might need to be expanded (Loc Types, Statuses, etc.).
3. New field(s) need to be introduced.
4. Other structure problems, loading problems, etc.
Report all potential issues promptly so that they can be addressed.
11 Special Situations
11.1 Multiple-tenant locations
(See above)
11.2 Side Street Locations
(Coming soon)
11.3 Islands
(Coming soon)
11.4 Fantasy Maps
(Coming soon)
11.5 Model Maps
(Coming soon)
12 STEP II: UPLOADING THE SPREADSHEET INTO THE DATABASE
You must have an account to do this:
1. Go to www.SouthBayStreets.com.
2. Create an account.
3. Send the email address you used to create the account to your manager.
4. Wait for a reply from your manager. Your manager will make you an editor of the map(s) you are assigned to and send you the map ID(s)).
5. Go to www.southbaystreets.com/ImportLocations?id=MAP_ID (MAP_ID is the ID if the Map you want to work on).
6. Continue by reading and following the instructions on that page.
7. (View the loaded map using this link $FINISH$ PUT IT ON ImportLocations page.)
NOTES:
· (Optional) You may also view map information. Return to the ImportLocations page when ready.
12.1 Repeating the Process
You may repeat these steps until it’s no longer productive to use the spreadsheet. “No longer productive” means, after a point, when locations are mostly correct, it’s easier to abandon the worksheet and adjust data directly in the Streets application.
· If the steps are repeated, then you usually delete all the locations (between steps I and II) so that you can ‘start fresh’ each time.
· You can also load locations in stages (or groups) if you take care to avoid duplicates.
· After each load, check carefully that any multiple locations and side street locations have been loaded correctly, since these are ‘trickier’ than the standard spinal street locations.
13 STEP III: ADJUSTING THE MAP DATA IN THE DATABASE
You will reach a point when the data is well loaded, and it’s more “efficient” to stop re-loading the spreadsheet and make any final adjustments within the application. You can decide when this point is reached. Here are a few guidelines:
· You get the spreadsheets loaded and the data looks good. Then new information comes in, like a new location or new information about a location. In that case, it can be easier to use the app to make these changes.
· Now that you see the locations on the map, you can see that slight modifications are needed, like moving locations or adjusting frontage length.
· Some steps can only be performed with the application.
13.1 Linking to other Maps
Although you can specific a LinkedMap (ID) for a location, some of these linked map IDs may not be ready at the time you upload. So they will need to be added when they become available.
13.2 Adding Pictures
You can’t load pictures with the spreadsheet, but you can load them with the app. If you have any pictures for any locations:
1. Open the ViewLocation page.
2. Click on the Pics tab,
3. Click to add pictures.
13.3 Other?
Any other post-load modifications are to be determined and will be described here if/when they become available.
14 STEP IV: COMPLETION
1. Report back to your manager that you have completed the preparation of your map.
2. Send the spreadsheet with data (for reference).
15 Appendix A: Specific Maps
15.1 Map Set: Hermosa Beach Downtown (Map Set Id 9)
15.2 Map Set: Manhattan Beach 90266 Downtown (Map Set Id 3)
15.2.1 90266 Downtown: Picture
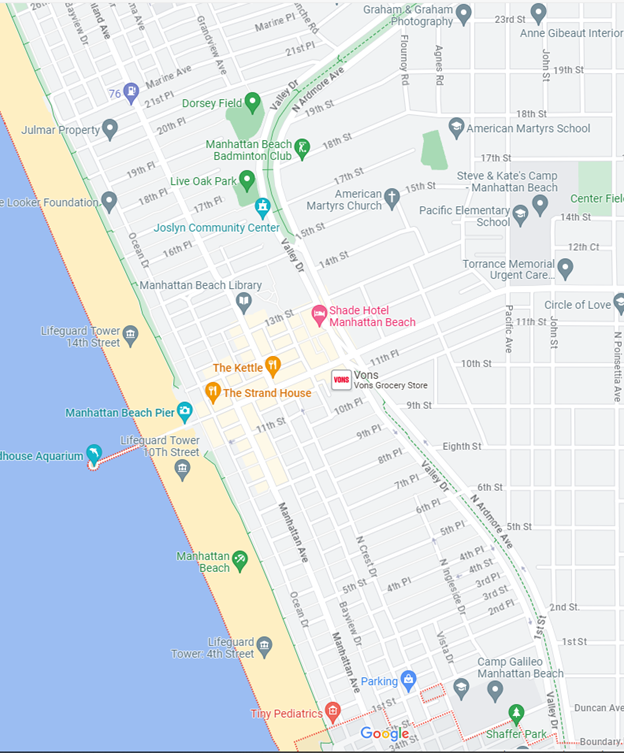
15.2.2 90266 Downtown: Map List
The maps for Manhattan Beach downtown should be completed, as follows:
|
Map Id: |
Center (spinal) street: |
From-to: |
Notes: |
|
54 |
Islands |
(contains all merchants that don’t fit well on other maps) |
See How to Use the Fantasy Maps |
|
12 |
Highland |
North: To the north city border. South: To the north city border. |
|
|
19 |
ManBch |
West: The end (at the ocean) East: To Valley Drive |
|
|
13 |
Manhattan |
North: To the north city border. South: To the north city border. |
|
|
17 |
Marine |
West: The end of the street. East: To Valley Drive |
|
|
|
|
|
|
15.2.3 90266 Downtown: Instructions
Fill in the spreadsheet for these five maps using the instructions provided in this ‘how-to’ guide.
15.3 Manhattan Beach Corridors (Map Set Id 5)
15.4 Riviera Village (Map Set Id 7)
15.5 Artesia Blvd. (Map Id 1) – Check and Complete Contact Info
Inputs: The spreadsheet of Artesia 90278
Goals:
1. Fill in all ‘-to-be-set-“ occupant info
2. Fill in all ‘-to-be-set-“ occupant Area and SubArea info
3. Fill in all contact information for the spreadsheet, including:
Occupant name (if missing)
Occupant phone number
Occupant URL
4. Fill in all Latitude, Longitude data for each location.
Instructions:
1. All your changes to the spreadsheet should be in dark green.
2.
15.6 Aviation Blvd. (Map Id 4) – Check and Complete Contact Info
16 Appendix B: All Fields
(FOR REFERENCE ONLY, DO NOT USE)
Location loc_Id
Location loc_MapId
Location loc_LinkedMapId
Location loc_ParentLocationId
Location loc_TypeCode
Location loc_SubTypeCode
Location loc_TypeTags
Location loc_Name
Location loc_StreetNumber
Location loc_StreetNumExt
Location loc_StreetNameCode
Location loc_StreetSideCP
Location loc_SeqNum
Location loc_StatusCode
Location loc_SubStatusCode
Location loc_QualityCode
Location loc_DevNotes
Location loc_TestNotes
Location loc_Descr
Location loc_Notes
Location loc_FrontageLength
Location loc_SquareFootage
Location loc_SizeNotes
Location loc_ConditionNotes
Location loc_AddressLine1
Location loc_AddressLine2
Location loc_SuiteNo
Location loc_PoBoxNumber
Location loc_City
Location loc_State
Location loc_PostalCode
Location loc_CountryCode
Location loc_Latitude
Location loc_Longitude
Location loc_PerimeterLatLongNESWCdl
Location loc_GeoLocationType
Location loc_GeoLocation
Location occ_AreaCode
Location occ_SubAreaCode
Location occ_AreaTags
Location occ_Name
Location occ_NameSubtitle
Location occ_NameAddl
Location occ_Descr
Location occ_Notes
Location occ_ContactANUId
Location occ_ContactName
Location occ_ContactPhoneNumber
Location occ_ContactEmailAddress
Location occ_ContactUrl
Location occ_ContactMoreInfoJson
Location occ_CustTypesJson
Location occ_CustInteractionTypesCdl
Location own_CompanyName
Location own_ContactANUId
Location own_ContactName
Location own_ContactPhoneNumber
Location own_ContactEmailAddress
Location own_ContactUrl
Location own_ContactMoreInfoJson
Location loc_Created
Location loc_Creator
Location loc_Updated
Location loc_Updater
Location loc_FlexText01
Location loc_FlexText02
Location loc_FlexText03
Location loc_FlexText04
Location loc_FlexText05
Location loc_FlexText06
Location loc_FlexInt01
Location loc_FlexInt02
Location loc_FlexReal01
Location loc_FlexReal02
Location loc_FlexDeci01
Location loc_FlexDeci02
Location loc_FlexDate01
Location loc_FlexDate02